Newsletter
Launch X-431 X431 IV Auto Scanner Globle Version X431 Master User Tips
x431-iv-package-list-careucar.xls (24K)
Launch X-431 X431 IV Auto Scanner Globle Version X431 Master Tips
Launch X-431 X431 IV Auto Scanner Globle Version X431 Master Tips
1. About connection for diagnosis
There are many non-16pin adapters in the package. How to use them to diagnose your vehicle? If your car is 38pin Benz, here is the connection order:
Car diagnosetic port -- benz 38 pin adapter -- main test cable -- x431 IV
Every cable will have the mark, you can find the cable easily. After done, check the connection, whether the OBD port is powered on.
2. About printer function
X431 V has the internal printer. You can use it to print the diagnose result. When print paper is run out, you can buy the print paper on your local area or from us. Pay attention: install the paper in right order, do not Install backwards, otherwise it will not print. If you install the paper backwards, do not worry, install it again.
3. About Touch-screen calibration
Please use the pen to celibrat the touch screen. Some customers will use the finger, do not use finger, just use the pen.
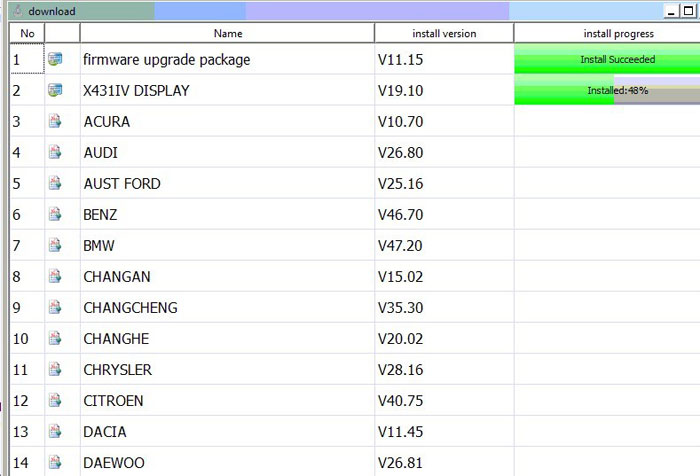
4. About update
Now update has been updated. After you log in your account, go to download center, you can find the software package, software will be download automatically after you insert the TF card to your laptop and install the update tool ready. No need you to download the software from one model to another model manually. More convenient to update.
Launch X-431 X431 IV Auto Scanner Globle Version X431 Master Instruction:
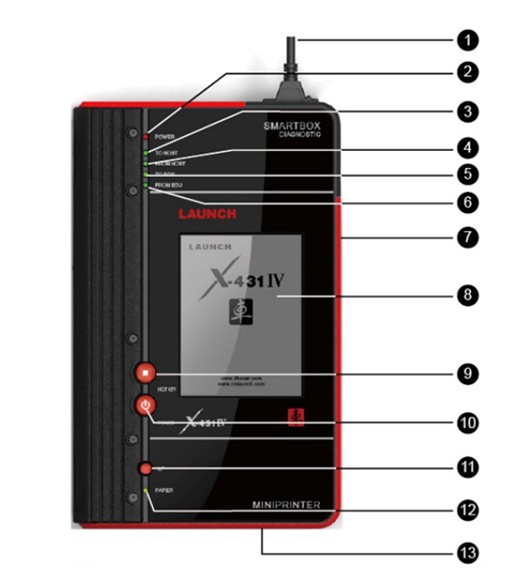
1, Diagnostic connector (rotatable)
2, SMARTBOX Power indicator
3, Indicator to show SMARTBOX sending data to the main unit
4, Indicator to show SMARTBOX receiving data from the main unit
5, Indicator to show SMARTBOX sending data to ECU
6, Indicator to show SMARTBOX receiving data from ECU
7, Serial port (to connect with PCLINK for extending functions)
8, Touch screen
9, HOTKEY button
10, Power button
11, Printer LF button (paper feed)
12, Printer ready indicator
13, Paper out (printed the data)
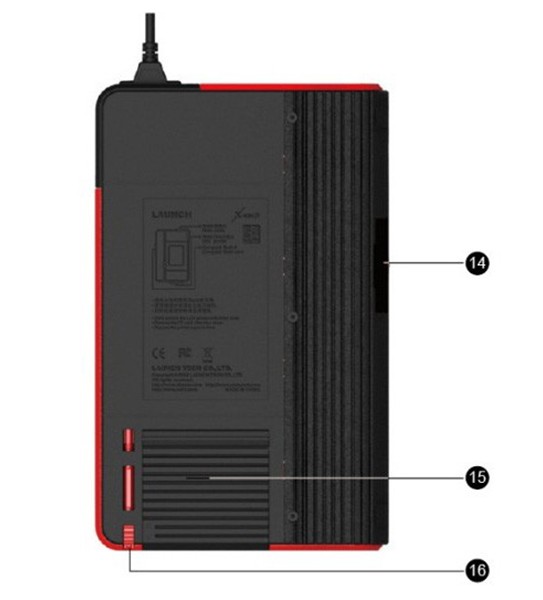
14, CF card slot (to install CF card)
15, Printer cover (to install printing paper)
16, Stylus slot ( to place the stylus)
There are many non-16pin adapters in the package. How to use them to diagnose your vehicle? If your car is 38pin Benz, here is the connection order:
Car diagnosetic port -- benz 38 pin adapter -- main test cable -- x431 IV
Every cable will have the mark, you can find the cable easily. After done, check the connection, whether the OBD port is powered on.
2. About printer function
X431 V has the internal printer. You can use it to print the diagnose result. When print paper is run out, you can buy the print paper on your local area or from us. Pay attention: install the paper in right order, do not Install backwards, otherwise it will not print. If you install the paper backwards, do not worry, install it again.
3. About Touch-screen calibration
Please use the pen to celibrat the touch screen. Some customers will use the finger, do not use finger, just use the pen.
4. About update
Now update has been updated. After you log in your account, go to download center, you can find the software package, software will be download automatically after you insert the TF card to your laptop and install the update tool ready. No need you to download the software from one model to another model manually. More convenient to update.
Launch X-431 X431 IV Auto Scanner Globle Version X431 Master Instruction:
1, Diagnostic connector (rotatable)
2, SMARTBOX Power indicator
3, Indicator to show SMARTBOX sending data to the main unit
4, Indicator to show SMARTBOX receiving data from the main unit
5, Indicator to show SMARTBOX sending data to ECU
6, Indicator to show SMARTBOX receiving data from ECU
7, Serial port (to connect with PCLINK for extending functions)
8, Touch screen
9, HOTKEY button
10, Power button
11, Printer LF button (paper feed)
12, Printer ready indicator
13, Paper out (printed the data)
14, CF card slot (to install CF card)
15, Printer cover (to install printing paper)
16, Stylus slot ( to place the stylus)